Recent Post

Tuesday, 17 May 2016


Place a thick-bottomed saucepan over a medium heat and add oil. Once hot, add the sliced onions and cook until golden brown, stirring occasionally
  • 1 onion, sliced
  • 1 tbsp of vegetable oil
Add the ginger and garlic pastes. Stir well for 2 minutes, then add salt, turmeric and chilli powder and fry for a further 5 minutes
  • 1 tsp ginger paste
  • 1 tsp garlic paste
  • 1 pinch of salt
  • 1/2 tsp turmeric
  • 1/4 tsp red chilli powder

Add the potatoes and carrots to the pan. Once almost cooked through and tender, add the beans, green peas, cumin powder and crushed coriander seeds
  • 1 medium potato, diced
  • 1 carrot, diced
  • 50g of green beans, chopped
  • 50g of peas
  • 1 tbsp of ground cumin
  • 1/2 tsp coriander seeds, crushed

Cook over a high heat, stirring regularly until the vegetable mixture is quite dry. Remove from the heat, transfer to a plate and set aside. This can be prepared in advance
Preheat the oven to 180°C/gas mark 4

    Allow the pastry sheet to soften slightly, then unwrap on a chopping board and cut in half lengthways. Spoon the vegetable mix along one of the long sides of the pastry
    • 320g of puff pastry

    Using a pastry brush dipped in water, brush the edges of the prepared sheet lightly. Lift the pastry from underneath the filling and roll over to seal in the vegetables

      Press the edges gently together to form a sausage roll shape
        Cut the roll into (approximately) 1.5 inch long parcels. Gently lift the puffs onto a baking tray. Dip the pastry brush into the whisked egg yolk and use to brush the top of the puffs
        • 1 egg yolk, beaten

        Bake for 12-15 minutes, or until the puff pastry has fluffed up nicely and is golden brown. Serve the vegetable puffs warm
        0

        Friday, 13 May 2016


        Chicken Tikka Masala
        A classic popular Indian dish that is so full of flavor and so easy to make. This chicken tikka masala is better than take-out.
        Ask any Englishman and most of us do love a good curry, but it must be an Indian curry, the most popular takeaway food in the UK. Over 200 years ago the first ‘curry house’ opened and it’s been a British food staple ever since and Indian cuisine has become a $5 billion a year industry. In fact, London has more Indian restaurants than Mumbai and Delhi. But one can’t just live on takeaway food, (well, my friends might beg to differ) because I prefer to make it myself so I know what ingredients I’m eating, so, this started my quest to find my own ‘takeaway’ recipe.
        Chicken Tikka Masala
        Chicken tikka masala is the most popular Indian dish, but it’s not very waist friendly because it’s loaded with heavy cream, so I replaced the cream with milk and yogurt.  This recipe is not only healthier, but is very easy to make and turns out delicious every time. I found my takeaway right in my own kitchen and the leftovers are even better!
        Chicken Tikka Masala
         

        Prep time
        Cook time
        Total time
         
        Cuisine: Indian
        Serves: 4-6 servings
        Ingredients
        • 2 pounds boneless skinless chicken breasts, cut into large cubes
        • 5 ounces low fat plain yogurt
        • 1 tablespoon garam masala
        • 1 teaspoon coriander
        • 1 teaspoon salt, divided
        • 1½ tablespoons vegetable oil
        • 1 large onion, cut into large pieces
        • 1 tablespoon fresh ginger, grated
        • 3 cloves garlic, grated
        • 1 tablespoon cumin
        • 1 teaspoon ground fenugreek
        • 2 tablespoons tomato paste
        • 1-14oz can of crushed tomatoes
        • ½ cup milk
        • 3 tablespoon fresh cilantro, chopped (optional)

        Instructions

        1. To a large bowl add the yogurt, garam masala, coriander and ½ teaspoon salt, mix well.
        2. Mix in the chicken pieces to the yogurt, cover and refrigerate for 2 hours.
        3. After 2 hours remove from the refrigerator.
        4. To a large saucepan add the vegetable oil over medium heat.
        5. Add the onions and cook until softened, about 5 minutes.
        6. Add the grated ginger, garlic, cumin, fenugreek and ½ teaspoon salt.
        7. Stir the spices into the onions until well mixed and cook for 1 minute, stirring often.
        8. Stir in the tomato paste and cook for a few seconds while stirring.
        9. Add the chicken and yogurt, stir.
        10. Add the tomatoes and milk, mix well.
        11. Simmer on low heat uncovered until sauce thickens and the chicken is cooked and tender, about 15 minutes.
        12. Serve over basmati rice and garnish with cilantro with a side of naan bread.


        Chicken Tikka Masala
        0

        Tuesday, 10 May 2016

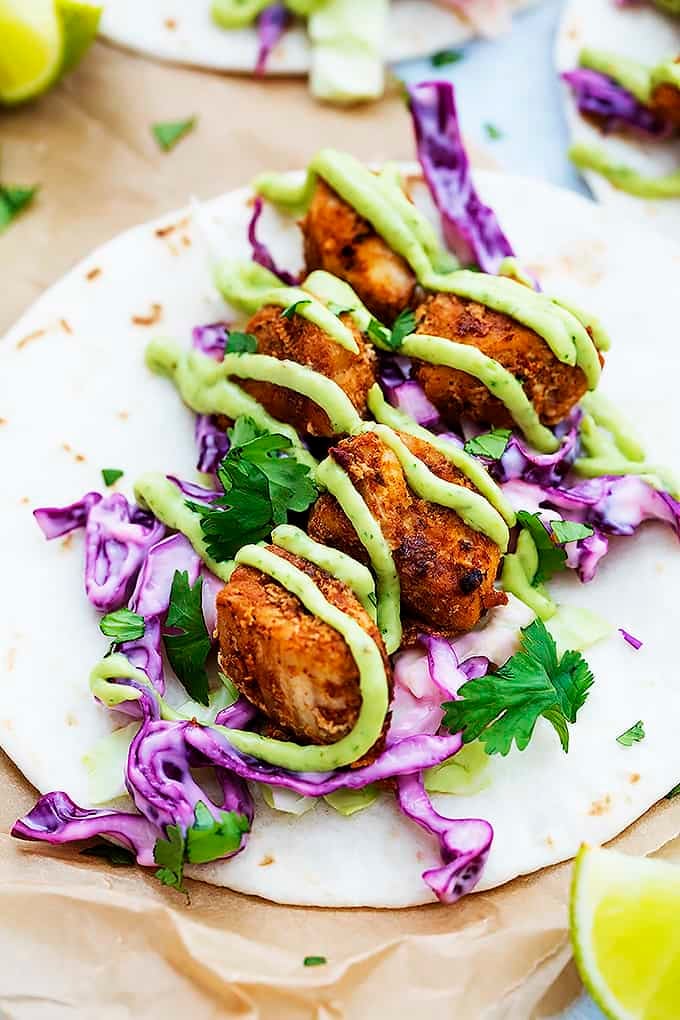
        Quick and easy Baja fish tacos! Flaky white fish seasoned and blackened, then served in flour tortillas with creamy slaw and zesty avocado sauce! 
        Baja Fish Tacos | Creme de la Crumb
        I really really really love tacos. Especially fish tacos. I’ve had some mahi mahi fish fillets waiting in the freezer for a couple of months, ready to be used for some homemade Baja fish tacos but my husband also really loves tacos and he has been traveling for work (business men. what’re ya gonna do.) so every time I put these on the menu and realized he’d be out of town, I’d pout, strike through  my beloved fish tacos, and put them off for another week.
        Baja Fish Tacos | Creme de la CrumbBaja Fish Tacos | Creme de la CrumbWell he fiiiiiinally stopped traveling (for a minute anyway. tears of joy!!!) and the first thing I put on our menu last week was Baja fish tacos. Last Fall we took a little road trip up the coast of Southern California and stopped at a taco shack on the side of the road in Malibu. We shared chicken, steak, and fish tacos. They were all downright delicious but those Baja fish tacos…. they stole my heart and I’ve been dreaming of them ever since.
        Baja Fish Tacos | Creme de la Crumb
        This recipe is so SO easy. The fish gets sautéed with seasonings and fresh lime juice, then wrapped in soft flour tortillas with creamy cabbage slaw and topped with a quick and suuuuper yummy zest lime-avocado sauce! They’re absolutely insanely tasty and come together in less than 30 minutes. If you like fish tacos, you will LOVE these!!!
        Baja Fish Tacos | Creme de la Crumb
        FISH TACOS


        PREP TIME
        COOK TIME
        TOTAL TIME
        Quick and easy Baja fish tacos! Flaky white fish seasoned and blackened, then served in flour tortillas with creamy slaw and zesty avocado sauce!
        INGREDIENTS
        • 1 pound white fish (I used 4 4-ounce mahi mahi fish fillets), cut into 1 inch pieces
        • ¼ cup taco seasoning
        • juice of 1½ limes, divided (plus additional lime wedges for serving)
        • 2 cups slaw or thinly sliced cabbage
        • ¼ cup mayo
        • 8 taco-sized flour tortillas (6-inch tortillas)
        avocado sauce
        • 1 medium or large avocado
        • juice of 1 lime
        • ⅓ cup cilantro
        • 4 tablespoons mayo or plain greek yogurt
        • 1 teaspoon salt (or to taste)
        • 1 teaspoon garlic powder
        • milk or water, as needed
        INSTRUCTIONS
        1. In a blender or food processor combine the avocado, lime juice, cilantro, mayo (or greek yogurt), and salt and garlic powder for the sauce and pulse til smooth. Add 1 tablespoon or milk or water at a time until desired consistency is reached. (You just want it to be easily spreadable and smooth) Set aside.
        2. Toss slaw or cabbage with ¼ cup mayo and juice from ½ of a lime. Set aside.
        3. Grease a skillet and preheat over medium heat. Add fish pieces. Drizzle juice from 1 lime over fish, then sprinkle with taco seasoning and saute over medium heat 6-8 minutes until outside is browned and fish is tender.
        4. Assemble tacos by dividing slaw, fish, and avocado sauce between tortillas. Serve with additional cilantro and lime wedges.
        0


        Churro Ice Cream Bowls~DROOL ALERT…~

        Makes 8 churro bowls

        INGREDIENTS
        ¼ cup butter, cubed
        2 Tbsp. brown sugar
        ½ tsp salt
        1 cup water
        1 cup flour
        1 tsp vanilla
        4 eggs
        Cooking-oil spray
        Oil for frying
        Cinnamon sugar
        Ice cream
        Hot fudge and caramel topping (optional)

        Equipment:
        Piping bag with a small star tip
        Muffin tin (6 to 12 cups)

        PREPARATION
        In a medium saucepan over medium-high heat, add butter, brown sugar, salt, and water, and bring to a boil. As soon as the butter has fully melted and the mixture begins to boil, reduce the heat to medium-low and add in flour. Using a wooden spoon, stir until the dough comes together to form a ball (about 1 minute). Remove from heat and let cool for 5 minutes before proceeding to the next step (to prevent accidentally cooking the eggs).

        Mix in the vanilla extract and add in the eggs, one at a time, being sure to fully incorporate each egg before adding the next. Once all the eggs are incorporated, transfer it to a piping bag with a small star tip.

        Invert a muffin tin and spray thoroughly with nonstick cooking spray. Pipe the dough around the inverted cups in spirals to form the bowls. Immediately transfer the tray to the freezer and freeze until solid (about 3 hours or overnight).

        Heat oil in a deep pot to 350˚F (175˚C). Remove the muffin tin from the freezer and flex it to release the churro bowls (you may need to also use a small knife under the bottom edge to initially release them). Return any extras to the freezer while you wait to fry.

        Fry them in batches, until nicely browned, no more than 3 at a time. Be sure to carefully tip them into the oil so they sink to the bottom. Once desired color is reached, remove them from the oil to a paper towel–lined plate. Dab off any excess oil then roll them in cinnamon sugar. Fill with your favorite ice cream and toppings. Enjoy!
        0

        Saturday, 7 May 2016

        SERVES
        16
        PREP TIME
        -
        COOK TIME
        -
        INGREDIENTS
        15
        Pistachio ice cream and cacao slice
         The pure pistachio flavour in this slice comes from an easy homemade pistachio milk, which is perfect with the fudgy cacoa base.


        INGREDIENTS

        • 165g coconut oil
        • 3/4 cup (75g) cacao powder
        • 1/4 cup (60ml) maple syrup
        • 4 eggs, separated
        • 110g coconut sugar
        • 3 cups (300g) almond meal
        Pistachio milk
        • 1/2 cup (80g) shelled pistachios, soaked overnight in cold water
        • 1/2 tsp vanilla bean paste
        • 1/2 tbs coconut sugar
        Peppermint cacao nib ice cream
        • 2 cups (500ml) pistachio milk (recipe follows)
        • 600ml thickened cream
        • 6 egg yolks
        • 1/2 cup (125ml) maple syrup
        • 1/3 cup (40g) cacao nibs
        • Roughly chopped pistachios, to serve


        METHOD

        • 1
          Preheat the oven to 160°C. Grease and line a 20cm x 30cm lamington pan with baking paper.
        • 2
          Place oil, cacao and maple syrup in a saucepan over medium-low heat and stir until melted and smooth. Remove from heat and set aside to cool completely.
        • 3
          Beat egg yolks and sugar in a bowl until thick and pale. Add cooled cacao mixture and stir to combine, then fold in almond meal. In a separate bowl, whisk eggwhites to stiff peaks. Fold one-third eggwhite mixture through cacao mixture to loosen, then fold through remainder. Spread into pan and bake for 20 minutes or until edges firm up and centre is still fudgy.
        • 4
          To make the pistachio milk, drain and rinse the pistachios and place in a blender with 500ml (2 cups) water. Whiz until smooth. Add vanilla and sugar, and whiz to combine. Transfer to a sterilised bottle and chill until cold. 
        • 5
          For the ice cream, place pistachio milk and cream in a saucepan over medium heat. Whisk egg yolks and maple syrup in a large bowl until thick and pale. As soon as the cream mixture starts to bubble around the edges, pour it into the yolk mixture, whisking constantly. Clean saucepan, then return mixture to pan and place over medium-low heat. Cook, stirring constantly, for 18 minutes or until slightly thickened and smooth. Transfer to a bowl and cover surface with plastic wrap. Cool to room temperature, then chill for 2 hours.
        • 6
          Transfer pistachio milk mixture to an ice cream machine and churn according to the manufacturer’s instructions. (Alternatively, pour into a shallow container and freeze for 2 hours or until frozen at edges. Remove from freezer and beat with electric beaters. Return to the container and refreeze. Repeat 2 or 3 times). Fold through cacao nibs and spread ice cream over cacao cake. Freeze for 3 hours or until firm.
        • 7
          Remove from the pan and scatter with pistachios to serve.
        0

        This slow cooker teriyaki chicken recipe is easy to make in your Crock-Pot. Plus the homemade teriyaki sauce is naturally sweetened, making it a chicken teriyaki recipe you can feel good about enjoying down to the last bite.
        Slow Cooker Teriyaki Chicken + Crock-Pot #Giveaway | gimmesomeoven.com
        Hey guess what?  I made you a new recipe with your three favorite words in the title — slow cooker chicken.
        That’s right.  Without fail, requests for slow cooker recipes and chicken recipes seem to far outweigh all other topics in surveys and your emails.  So today I’m doing a two-for-one and also introducing a healthier new take on a classic — Slow Cooker Teriyaki Chicken!
        This version includes all of the delicious sweet and savory teriyaki flavors you love.  But this easy homemade teriyaki sauce is naturally sweetened with honey instead of refined sugar.  And since your slow cooker is going to do most of the work for you, there is very minimal prep time required.  I think we can call that a win-win.
        Slow Cooker Teriyaki Chicken + Crock-Pot #Giveaway | gimmesomeoven.com
        I mean, really, just look at that chicken drenched in that thick, sweet teriyaki sauce.  It’s calling your name.
        Here’s how to make it happen.

        Slow Cooker Teriyaki Chicken + Crock-Pot #Giveaway | gimmesomeoven.com
        First we begin by making the teriyaki sauce base.  Simply whisk together the ingredients.
        Slow Cooker Teriyaki Chicken + Crock-Pot #Giveaway | gimmesomeoven.com
        Then lay your chicken breasts out in a single layer in your slow cooker and pour the sauce over them.  Cover and cook on high for about 4-5 hours, or until the chicken basically falls apart when shredded with a fork.  Get ready, because your home is going to smell a-ma-zing.
        Slow Cooker Teriyaki Chicken + Crock-Pot #Giveaway | gimmesomeoven.com
        Once the chicken is cooked, remove it with a slotted spoon and shred it on a separate plate or in a bowl.
        Then transfer the remaining teriyaki sauce to a small saucepan, and whisk a cornstarch slurry.  Bring it to a boil and let it thicken.  Then pour the sauce on top of your shredded chicken.
        Slow Cooker Teriyaki Chicken + Crock-Pot #Giveaway | gimmesomeoven.com
        Gently toss to combine.  And then comes the hardest part — deciding how you’re going to enjoy it!
        Slow Cooker Teriyaki Chicken + Crock-Pot #Giveaway | gimmesomeoven.com
        I actually enjoyed my first serving on a little teriyaki chicken slider.  So simple!
        Slow Cooker Teriyaki Chicken + Crock-Pot #Giveaway | gimmesomeoven.com
        But of course, the classic way would be over rice.   even just on its own, with a side of veggies.  I’m pretty sure you can’t go wrong any way you choose, especially with that heavenly homemade teriyaki sauce.  You’re gonna love it!
        This Slow Cooker Teriyaki Chicken recipe is simple to make, full of great flavor, and made with natural sweeteners.

        INGREDIENTS:

        • 2 lbs boneless, skinless chicken breasts
        • 2 cloves garlic, minced
        • 1/2 cup chopped white onion
        • 1/2 cup honey
        • 1/2 cup soy sauce (use low-sodium if desired)
        • 1/4 cup rice wine vinegar
        • 1 Tbsp. chopped fresh ginger
        • 1/8 tsp. freshly ground black pepper
        • 1/4 cup cold water
        • 3 Tbsp. cornstarch
        • (optional toppings: sliced scallions and toasted sesame seeds)

        DIRECTIONS:

        Add the chicken breasts to the bottom of your slow cooker in a single layer.
        In a separate bowl, whisk together the garlic, onion, honey, soy sauce, rice wine vinegar, ginger, and black pepper until combined. Pour the mixture on top of the chicken breasts. Cover slow cooker, and cook on high for 4-5 hours, or until the chicken is cooked through and shreds easily with a fork. Remove the chicken with a slotted spoon to a separate bowl and shred it using two forks. Transfer the remaining teriyaki sauce from the slow cooker to a medium saucepan.
        Meanwhile in a separate bowl, whisk together the cold water and cornstarch until the cornstarch is dissolved and no longer lumpy. Pour the cornstarch slurry into the teriyaki sauce mixture, and whisk to combine. Bring the mixture to a boil over medium-high heat, and let it boil for about 1-2 minutes or until thickened. Remove from heat, and pour the sauce on top of the shredded chicken. Toss to combine.

        Serve topped with scallions (green onions) and toasted sesame seeds if desired.
        0

        Don't Forget To Hit Like